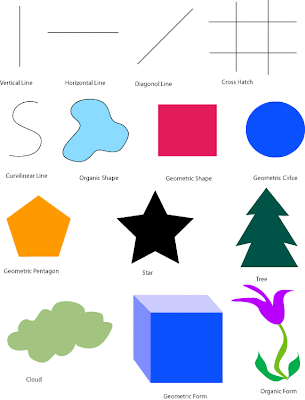
Adobe Illustrator can be a frustrating program for beginners because it is a vector-based graphics programs. Instead of coloring things with paint buckets or pencils, you use Illustrator to draw outlines of shapes, which have a FILL COLOR and a STROKE (outline) COLOR. It is like cutting out pieces of construction paper and stacking them together to create a picture. Once you draw a shape, it is a discrete object until it is joined, grouped, or merged with another object.
Purpose – Today’s lab is a step by step drawing exercise to learn how to control the tools in Illustrator. If miss any of the steps or prefer to try to learn on your own, please read the instructions below. Following these steps will help you begin to control the tools and create the basic elements of art.
Procedure – Today’s lab will involve the following steps
1. Observing the demonstration at the front of the room.
2. Reading the instructions carefully and completing the lab.
Drawing Instructions
1. Vertical Line –
a. Click on the LINE tool.
b. Hold the SHIFT key and pull your mouse downward.
c. Click on the TYPE tool and type in the element name.
d. Click on the SELECTION tool to deselect the text box.
2. Horizontal Line
a. Use the LINE tool again holding SHIFT but this time drag the mouse to the right.
b. Use the TYPE tool to label the element.
3. Diagonal Line
a. Use the LINE tool again holding SHIFT but this time drag the mouse on a downward angle.
b. Label the element.
4. Cross Hatch
a. Make sure your STROKE color is BLACK.
b. Create two VERTICAL lines holding SHIFT.
c. Create two HORIZONTAL lines holding SHIFT.
d. Label the elements.
5. Curvilinear Line
a. Double-click the PENCIL tool.
b. Uncheck the KEEP SELECTED option and click OK.
c. Draw an S shape.
d. Label the element.
6. Organic Shape
a. Use the PENCIL tool to draw an organic shape.
b. Connect the ending point to the starting point to JOIN the line and close the shape.
c. Click on the FILL color and choose a color to fill the shape.
7. Geometric Shape
a. Click on the RECTANGLE tool.
b. Draw a rectangle.
c. Label the element.
8. Geometric Circle
a. Click and HOLD on the rectangle tool.
b. Change it to the ELLIPSE tool.
c. Use the ellipse tool and SHIFT to create a perfect circle.
d. Name the element.
9. Geometric Pentagon
a. Click and HOLD on the elipse tool.
b. Choose the POLYGON TOOL.
c. Draw out the shape and hold the mouse button down,
d. Press the UP and DOWN arrow keys to find the PENTAGON.
e. Label the shape.
10. Star
a. You can do this one on your own.
11. Tree
a. Click on the PEN tool.
b. Start by creating a point for the bottom left of the tree by clicking once.
c. Move the mouse to the next spot where the line changes direction and click.
d. Continue to click where the line changes direction until you reach the starting point.
e. Click on the SELECTION tool to deselect the tree.
f. Label the shape.
12. Cloud
a. Use the pencil tool to carefully draw the cloud shape.
13. Geometric Form
a. Use the RECTANGLE TOOL + the SHIFT key to draw a square.
b. Change the FILL color to BLUE by selecting the square and double clicking on the fill color.
c. Click on the PEN tool.
d. Use the PEN tool and SHIFT key to draw the side of the cube.
e. Click on the SELECTION tool to deselect the side.
f. Click on the side and press APPLE + J to join the shape if it isn’t closed.
g. Click the PEN tool to draw the top of the cube.
h. Make the side and top of the cube lighter tints of blue.
i. Label the form.
14. Organic Form.
a. Try this one on your own using the pencil tool.